Pages

Showing posts with label manicure. Show all posts

Thursday, October 16, 2014

I'm Back... With an Evil Eye Manicure!

It's been nearly a month since my last post, which makes me a bit sad.  I have no intention of stopping; life just seems to get in the way sometimes!  I've had some financial hardship lately as a result of moving combined with some unexpected car problems, and I've been picking up extra hours at my job to try to compensate (the week of my last post, I did three overnight shifts).  As a result, I have just been too tired to spend any time on my nails.  Until I'm caught up (or I am back to normal hours after Halloween), I probably won't be posting as often. 

While I'm a bit regretful that I didn't finish the 31-Day Nail Art Challenge, I'm also a bit relieved.  Did I enjoy the five days I did?  Definitely!  It was a good excuse to try some nail art I might not have done otherwise, and I quite liked some of the results!  Will I do it again, or try to finish? 

...No.

Honestly, that kind of posting schedule put too much stress on the process.  Nail art is my zen activity, and I want to keep it that way!  From now on, I will stick to challenges that are one-offs, or that are spaced out more :^)

NOW!  On to the nail art!  For this challenge, I wanted to do some Halloween-ish nail art that didn't involve pumpkins, bats, or grave stones (not to say those themes are lame; I just wasn't feeling it this time!)  Here's my result:


I was inspired partially by Alexa Chung's evil eye nail art, one iteration of which is shown here:

(Source)
....and partially by a bracelet that was given to me by my dear friend (and my brother's girlfriend) Caitlin.  A similar one:

So pretty!  (Source)
Here's some more photos of the results (scary cuticles and all):


Thanks for stopping by!  :^)

Monday, August 11, 2014

Citron and Deep Teal Chevron Nail Art

Hello, reader!  I'm not sure what took me so long to post this mani; it's my favorite in a long time.  The inspiration came to me all of a sudden; I just saw the shapes and colors together all at once.  For this design, I used striping tape to get a clear line.  I had a little smudging, but I'm happy with it anyway:

Sorry about my cuticles; they're a horrible mess right now!  I have no excuse; I'm home all day (Ah, the bittersweet joy of unemployment?).  I did just pick up some lovely lotion, so hopefully I will remember to slather it on at night :^)


For the citron base, I used two coats of Julep Alma.  This polish has a decent formula (especially compared to other Julep polishes, which seem in my experience to be either horribly gloopy or hopelessly sheer).  In real life, the color on the nail is closer to to the color that appears in the bottle above - a bit greener.  It's a really lovely color, and I'm super glad I picked it up.


For the teal, I used Sinful Colors Blue Crushin.  I am totally in love with this polish, which is strange since I'm not usually a teal or aqua fan.  It's pretty color accurate on the nails in the photo; perhaps a hair darker and greener, and a bit darker than it appears in the bottle.  Blue Crushin is super opaque; easily a one-coater.  It has a thick but not gloopy formula, but it does dry quickly so fast handiwork is recommended.  I did get a couple stringy bits while removing the tape, which resulted in the smearing you can see in the photos.


I reversed the chevron direction for an accent on each hand, which turned out subtle, but in a cool way!  I'm really proud of how this turned out; I think my skills are improving (especially in the cleanup arena. On my right hand (my Cinderella hand of course), I used a striping tape that hadn't been cut evenly, resulting in weird, uneven stripes...

This is the most color-accurate photo of these polishes.

Still, I was happy with the results!  Fun fact:  If you've been reading my blog, you may have noticed my nails are nubs again.  There is a reason, albeit a gross one!  I was walking my darling Charlie, and... erm... cleaning up after him, and the baggie had a hole in it...  There goes my thumb, with my nice long nails, right into a fresh steaming dog poo.  After that, no amount of washing made my hands feel clean, so I decided to cut them so that I could get them truly clean.  So that was a bit yuck.  Good thing Charlie's such a cutie! #dogmomproblems

Sorry mommy!


Tuesday, July 29, 2014

Updated French Tips - An "Interview" Manicure

Hi guys!  I've been job hunting like crazy since I moved to Tennessee, but it's been slow going... I've had two interviews for positions in my field (one was a disaster - all of the employees I spoke to, including my interviewers, couldn't stop talking about how little they were paid and how they couldn't wait to retire!), but since I don't know how long it will take to get a job in my field, I have applied to some other, "fun" jobs as well to fill the void in my bank account!
Yesterday, I had an interview with a popular women's clothing store that I won't name specifically (though it rhymes with Tan Sailor...).  Since interviews in my field always call for quite conservative looks, I wanted to do something a bit more modern and fashionable, but still classy and interview appropriate.  I settled on the classic french tip with a few modifications:
I apologize for the less than crisp photo; until I'm bringing in a paycheck
there's a moratorium on both polish (!!!) and lighting setup supplies :(
 First, I used OPI Don't Bossa-Nova Me Around, a pale pinky-neutral base, rather than a sheer.  I then applied skinny french tips that were thinner than my true nail line, which creates an illusion of longer fingers.  For the french tips I used Sally Hansen Chrome Nail Makeup in White Gold (There are quite a few near-dupes for this around; in case you can't get hold of this one online.  Essie Good as Gold is pretty close). 


Another note worth mentioning is the topcoat that I used - having run out of my go-to Salon Perfect top coat, I stopped at Walmart to pick some up only to find that they were out.  I ended up picking up some Revlon Diamond Gel Topcoat (non-UV-curing) to try out, because it seemed like it should be comparable.  A few minutes after my mani (around dinner time), the Revlon was dry to the touch and seemed cured... until I got up the next day with sheet marks :(  Not cool, Revlon.  Back to Salon Perfect, as soon as I can find it...

Have a great week!

Saturday, July 19, 2014

Hidden Neon Tribal Nail Art

Hey there!

I've been spending the last month or so working to finish up my Master's degree and moving from upstate New York to Knoxville, Tennessee.  It's been an extraordinarily stressful transition, but I'm finally beginning to settle in.  One of the first things I unpacked, naturally, was my nail polish and nail art supplies!  For this manicure, I wanted to do something summery, but unexpected, and I had an image in my head of a tribal pattern with a hidden pop of neon.  This is what I came up with:


If you're thinking, "Wow, your nails look really yellowed," nope!  Here's a different angle:


I was picturing a different take on the Louboutin manicure that was so popular about a year or so ago, but updated for the season.  I'm pretty pleased with how it turned out! 


For this manicure, I stamped Konad Black over Red Carpet Manicure SOG in White Out.  The neon under the tips is China Glaze Sun Worshiper, courtesy of my lovely friend Mary!  I used the Cheeky Viva Mexico! plate for these designs.

Have you ever updated an old trend for summer?  Let me know in the comments! :^)

Friday, April 18, 2014

Bunny Prints Skittle Pond Nail Art with OPI Sheer Tints

A few weeks ago I purchased the mini OPI Sheer Tints set.  I couldn't justify spending US $36 on polishes I probably wouldn't use that often, so I ended up springing (ha! no pun intended!) for the mini set (OPI Sheer Tints, Sheer Mini Hint of Tint).  There are two manicures I've been dying to try lately:  a pond manicure (see some amazing examples here and here) and a syrup manicure (here and here).  I've done the former here:

Please ignore my desiccated cuticles.
I've seen  lot of pond manicures that do dots or flowers, but with Easter coming up, I wanted to do something a bit different... enter, bunny prints!  For this manicure I used the Bundle Monster plate BM-424 to create the "bunny prints" between layers of OPI Sheer Tints topcoat.  Above, from pinky to thumb:  'I'm Never Amberrassed', 'Be Magentale With Me', 'I Can Teal You Like Me', 'Don't Violet Me Down', and 'I Can Teal You Like Me' again.

If you're not familiar with the concept of a pond manicure, it's similar to a jelly sandwich:  jelly/glitter/jelly; except triple or quadruple decker, and with light colored polish designs rather than glitter.  To make this design, I stamped little paws haphazardly and sparsely across bare nail.  I then topped it off with one of the sheer tints, and waited for it to dry.  I then layered more paw prints in other areas of the nail, and topped it off with another layer of sheer tint.  I repeated the stamp-tint step one more time (for a total of three layers of OPI sheer tint) and added one more set of paw prints to fill in any gaps and add another layer of dimension.  I then topped it off with a clear top coat.

Lefty.
For this manicure, I used the following products:
  • Base coat:  Sally Hansen Hard as Nails - Hard as Wraps
  • L'Oreal  French Tip White
  • OPI Sheer Tints minis in 'I'm Never Amberrassed', 'Be Magentale With Me', 'I Can Teal You Like Me', and 'Don't Violet Me Down'
  • Bundle Monster Stamping Plate in BM-424
  • Konad stamper
  • Top coat: Salon Perfect Top Coat
These worked great for a pond manicure, but I think they would be too sheer for a syrup manicure (unless you used like seven coats).  These definitely have a top coat formula; they smell similar to Seche Vite and Salon Perfect top coats and have similar qualities in terms of texture and drying time (i.e. glop it on like there's no tomorrow).  This was convenient, because the number of steps for this manicure would have made it a prohibitively long process if I had to wait ten to fifteen minutes before stamping each time.  As it was, I had to wait about 30 seconds.  On the negative side, it dried SO fast that I kept getting little polish strings everywhere, and if I used more than three strokes to cover the nail it started getting bumpy and draggy.

Squiiiiiishy!
Weirdly, I think my favorite color of the set is the yellow.  While I usually associate sheer, yellow nail color with stained or diseased nailbeds, the orangey-gold tone to this yellow translates more as "bright squishy marigold" rather than "witch fingers."  They are all pretty similar in terms of application, so it's really a matter of color preference.  In these photos, all of the colors except 'I Can Teal You Like Me' are represented pretty accurately; in real life, 'I Can Teal You Like Me' is much more of a teal (go figure) than a blue as it is shown here

Overall, I am really enjoying this mani.  I used this set once previously for a pond pedi and enjoyed that as well!  For the price (I paid $10.35 for the set of minis on Amazon), I think these are a great value and were definitely worth adding to my collection.

Have you ever done a pond manicure?


Bonus spring pedi picture!  Lookit my weird toes!


Thursday, April 17, 2014

Flame Princess inspired Nails

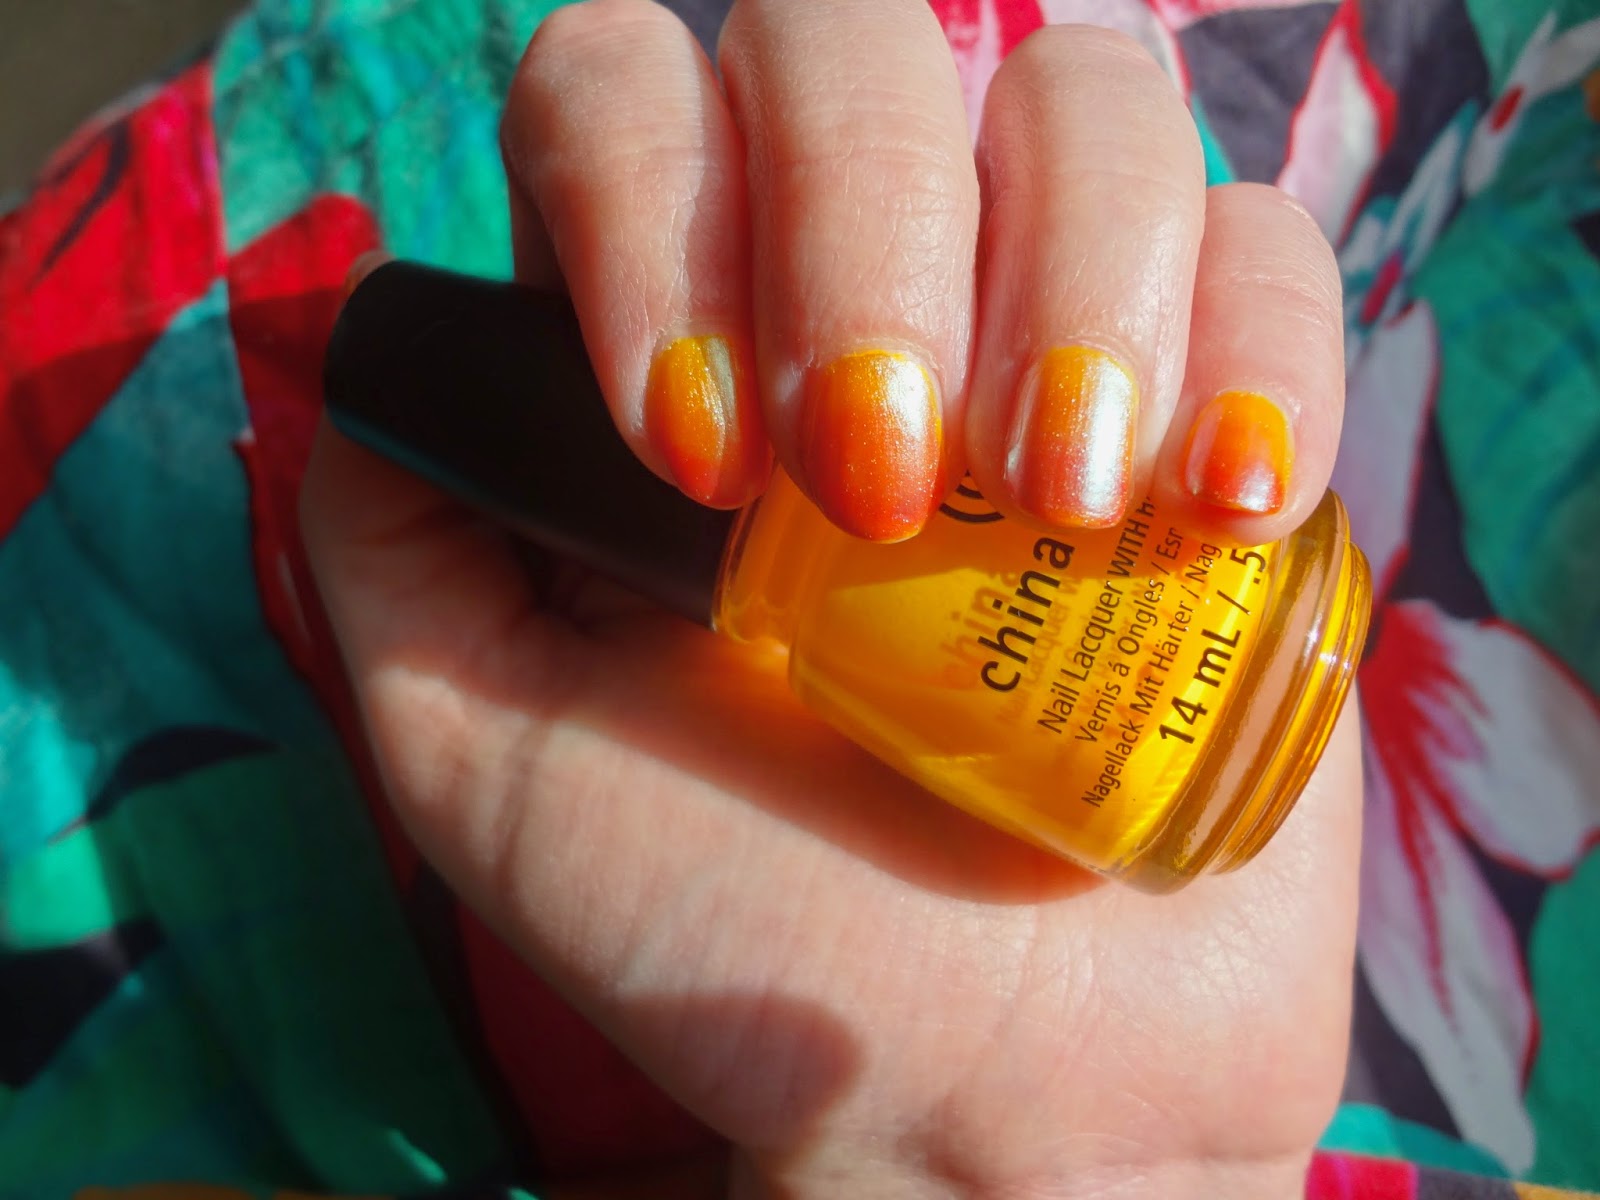
So my very FAVORITE television show in the entire world is Adventure Time... I don't know if it's the innocence, the pure silliness, or what, but that show always takes me to my calm, happy place.  If you watch the show, then you probably know that season two was recently added to Netflix, finally (Errr... a month ago.  Clearly I am on top of these things).  To commemorate the occasion, I did a manicure inspired by one of the characters:  Finn's on-again, off-again girlfriend, Flame Princess!

http://25.media.tumblr.com/02afc8d63a53139daa5dfbbd6aed4627/tumblr_miya1cr95B1rd0rbzo5_500.gif
 While I would have a super hard time choosing a favorite character (just kidding, it's Jake), Flame Princess is right up there.  The weather in Buffalo has been pretty nice lately, so I thought some bright colors would maybe nudge me into a more springy mindset.  Here's what I came up with!

This is actually after I'd been wearing it for about five days... one of the longest wearing manicures I've had in a long time.  Barely any tip wear!
For this mani, I did a sponge gradient and topped it off with an iridescent polish.  These are the polishes I used:
  • Base coat:  Sally Hansen Hard as Nails - Hard as Wraps
  • 2 coats China Glaze 'Sun Worshiper'
  • Sponged from middle of nail to free edge:  Wet n wild Wild Shine nail color in 'cursed'
  • Sponged onto free edge:  Essie 'Geranium' 
  • 1 coat Sinful Colors 'Let me Go'
  • Top coat:  Salon Perfect top coat
Sun Worshiper was a gift from my lovely friend Mary that came as part of CG's 'On the Dot' set.  It is an absolutely exquisite highlighter orange neon.  It is probably one of my absolute favorite colors in my collection due to its uniqueness and super punchy color.  The formula is typical of a neon; it dries matte, and for the fastest punch of color it's best layered over white.  Personally, I prefer neons over my natural nail; I always end up with white peeking out around the edges and it ends up looking sloppy... but that says more about my technique (or lack thereof) than anything!!!  I only used two coats (because I was adding more), but this polish is opaque in 3 thin coats.

Again in bright sunlight.  Here, you can see the tip wear on my thumb... the beginning of the end!!!
'Cursed' is a bright, medium orange crelly that is part of their recently released Street Art collection.  It's the orangest orange I have... if that makes any sense!  Most orange nail polishes I come across lean yellow or coral or red, but this one is just crayon orange.  It's very sheer, and requires 4-5 coats for opacity depending on thickness.  For a gradient, this was actually a super convenient finish.  I'm generally not a fan of the visible-nail-line look, but if you are looking for a sheerer orange, this is a great color.  The formula is very workable, not super streaky.  I definitely see myself using this a lot this summer!

'Geranium' is a very popular polish, and for good reason.  It's an orange-leaning red (or red-leaning orange?) cream with excellent opacity and formula.  It's a color I find myself reaching for a lot, but there are a lot of very similar colors out there (even within the Essie brand... 'Clam Bake' and 'Fifth Avenue' are pretty similar in shade).  Still, the formula really can't be beat, and I will buy it again when this bottle is gone! Opaque in one coat.

Indirect sunlight... the wear on the tip of my thumb is making my eye twitch!  Perhaps next time I will take photos BEFORE my manicure starts to self destruct...
Sinful Colors 'Let me Go' looks absolutely magical in the bottle... a swirly purple-blue-green duochrome that makes me think of fairies or unicorns.  As I expected when I purchased it, it is VERY sheer, but it looks awesome over undies.  The shimmer leans light green to white, and is really quite subtle and nice.  Even though the shimmer is suspended in a purple base, it does not seem to affect the color underneath (as you can see here).  Layered over dove gray or lavender, I imagine that you could get the color as it appears in the bottle in two thin coats.  Otherwise... probably five coats, maybe six.  On a side note, the name of this polish is just so serious and sad, it's a little depressing... pretty heavy for a nail polish I think.

IT'S SUMMER, DAMN IT.
I was waffling a bit on whether I liked the iridescent shimmer over the gradient, but I think it added an interesting dimension.  It seemed to hide the gradient somewhat, especially in bright artificial light, but as a result the gradient felt like a hidden Easter egg that you could only see in the right light.  Anyway, it was fun :^)

So on that note, I am going to go watch some Adventure Time... thinking about an AT nail art mani in a few weeks.  Perhaps, perhaps...

Have a great weekend!

Thursday, March 20, 2014

First Day of Spring Mani!

Happy first day of spring!  It's been a loooong time coming... this has been quite a winter!  I'm still up in Buffalo, New York, and there's still plenty of snow on the ground.  From what I hear, there is more on the way!

That said, signs of spring have begun to show up, even here.  The Canada geese are coming back, and we've had a couple of days above 40 degrees (F).  I'm still reaching for my boots to go outside, but I'm looking forward to sandal weather.

I have a special mani to show you today; I wanted to do something super springy, so I decided to do a handpainted floral design, inspired by this picture from the University of Tennessee Institute of Agriculture Entomology and Plant Pathology program:
https://ag.tennessee.edu/EPP/Pages/TrigianoResearch.aspx
This gorgeous bloom is from one of my favorite plants, the dogwood tree.  This, specifically, is a Cornus florida 'Cherokee Brave,' and it's part of the university's dogwood breeding program.  The UT Institute of Agriculture is located in Knoxville, the city I am excited to say that I will soon call home!  Each April since 1961, a festival has taken place in Knoxville celebrating the culture, arts, and natural beauty of the area.  The festival is held during the blooming period of the dogwood tree, which has become a symbol of the festival and of the beautification of the city.

Dogwood trees are pretty few and far between where I'm from because it's just too cold, but on the few occasions I've seen them in bloom, they're breathtaking.  Interestingly (from a scientific perspective!), dogwood flowers are actually the tiny, yellow-green nubs in the center of the bloom; the large, white to pink "petals" are actually bracts.  Fascinating!  The blooms are quite large, about the size of the palm of your hand, and the petals (er... bracts) are very stiff and tough, like leaves.

Anyhoo, I adore dogwood trees, and since it is the first day of spring and I will soon be moving to Knoxville, I thought there was no better ode to new beginnings than a dogwood manicure:

For this manicure, I did a gradient of China Glaze Budding Romance (perfect name, eh?) over Sally Hansen Hard as Wraps and two coats of Sinful Colors Adventure Island.  I used a teeny paintbrush to paint on branches with Julep Rooney, and painted on the flower petals using L'Oreal French Tip White.  Using the same small paintbrush that I used to paint the branches, I painted pink streaks on the petals with Ulta Fuchsiamania.  I added some other details in with the small brush using Adventure Island and Rooney, and then I did a little dot in the center of each bloom using Sally Hansen SALON Lacquer in Forsythia.  I topped it off with Salon Perfect top coat.

Over all, this mani took probably about two and a half hours, and I was pretty happy with the result.  I had a little trouble with my right hand (obviously), so it looks a bit like it was painted during a moderate-strength earthquake.  Honestly, though?  I'm fine with it.  Perfectionism isn't my bag.

Here's a closeup:


And heeeere's righty:

And a closeup of the right hand:
This was a really fun manicure to do, and I think I'll be doing more hand-painted manis in the future.  I hope that you enjoy this post as much as I enjoyed preparing it!  Enjoy your first day of spring!

What is your favorite hand-painted mani theme (e.g. florals, abstract, etc.)?  Tell me in the comments!

Tuesday, March 18, 2014

Julep Glam Roc and Goldie Review

I wanted to submit a belated review of two polishes from Julep's February 2014 "It Girl" subscription box:

I've been an on-again, off-again Julep subscriber for around six months.  In general, I skip their boxes because I don't have two nickels to rub together, but occasionally I will splurge and pick up some pretty, shiny polishes to cheer myself up (as my mom says, "I needed a new hat.")

Their subscription model is pretty straightforward:  You take a quiz, and are matched with one of three "style profiles."  Each style is a bit different.  Classic with a Twist generally has pretty conservative polish colors, and comes with two polishes and some sort of makeup product.  It Girl generally contains pretty funky shades, and you get three polishes and no makeup products.  At least one is a glitter almost every time.  I'd describe Boho Glam, which comes with two polishes and a makeup product, as "ugly pretty."  You get your mustard yellow, olive drab, shimmer turquoise kinds of colors here.  I'm a fan of that aesthetic, so that's the one I usually spring for.  Each month on the 20th, they send out an email to subscribers laying out the content of each box.  You have until the 24th to make any changes to your box (such as skip the month, switch to a different style profile, or pick up some box add-ons).  They ship the boxes on the 27th, at which point you're charged $19.99.  At this price point, the volume of product you're getting becomes a bit more reasonable.  The caveat here is that as of a few months ago, new subscribers can only skip boxes every six months, which is a HUGE  bummer if you're broke like me.  That said, if you don't mind (or can afford to) drop $20 a month on nail polish and makeup, I don't think you'll be disappointed.

I find that Julep's polishes, while ridiculously expensive ounce-per-ounce, particularly if you're not a subscriber (at $14 for only a quarter of an ounce), are of excellent quality.  I picked up the February "It Girl" box plus a few extras because I was feeling spendy that day, evidently.  After I ordered it, I panicked a bit because I had spent about $35 that I totally shouldn't have, but I really loved all of the polishes I got.  I promptly did a manicure using Glam Roc, which is a blackened purple "stardust finish" textured polish with holographic shimmer.  It is gorgeous and I love it so, so much.  I smushed the tips before they were dry (as I am wont to do) so I hid the damage with the add-on I picked up, Goldie... which took the mani to a whole other level.  I'm pretty sure this is my favorite combination:

Goldie is a yellow-gold microshimmer in a clear base.  It actually goes on pretty sheer (so not a good stamping polish, which was disappointing), but it's easily buildable.  It seriously looks like liquid gold.  It is SO PRETTY.  It dried down and didn't change the gritty texture of the Glam Roc underneath either, which I liked.  Here's another shot in natural light:

I'm not generally one to repeat a manicure more than once, but I did this manicure again a few weeks later.  I'm planning to do a review of some of the other polishes from this box soon; they're too beautiful not to wear again.  If I have somehow inspired you to subscribe to Julep, you are welcome to use my referral link here.  You can get your first box free with the code FREEBOX (you just have to pay for shipping).

I purchased this product with my own money.  Any and all opinions expressed on "The Knoxville Paintbox" are my own.